Product documentation
Important
Standard Microsoft Dynamics 365 for Finance and Operations enables users to import bank statements, like the MT940 and CAMT053 files. But the system does not help the user to settle these with outstanding invoices. As a result, after importing a bank statement, settlement is still a time consuming manual activity. With the reconciliation function of Banking the user only has to focus on the exceptions as the system will try to settle the payments automatically.
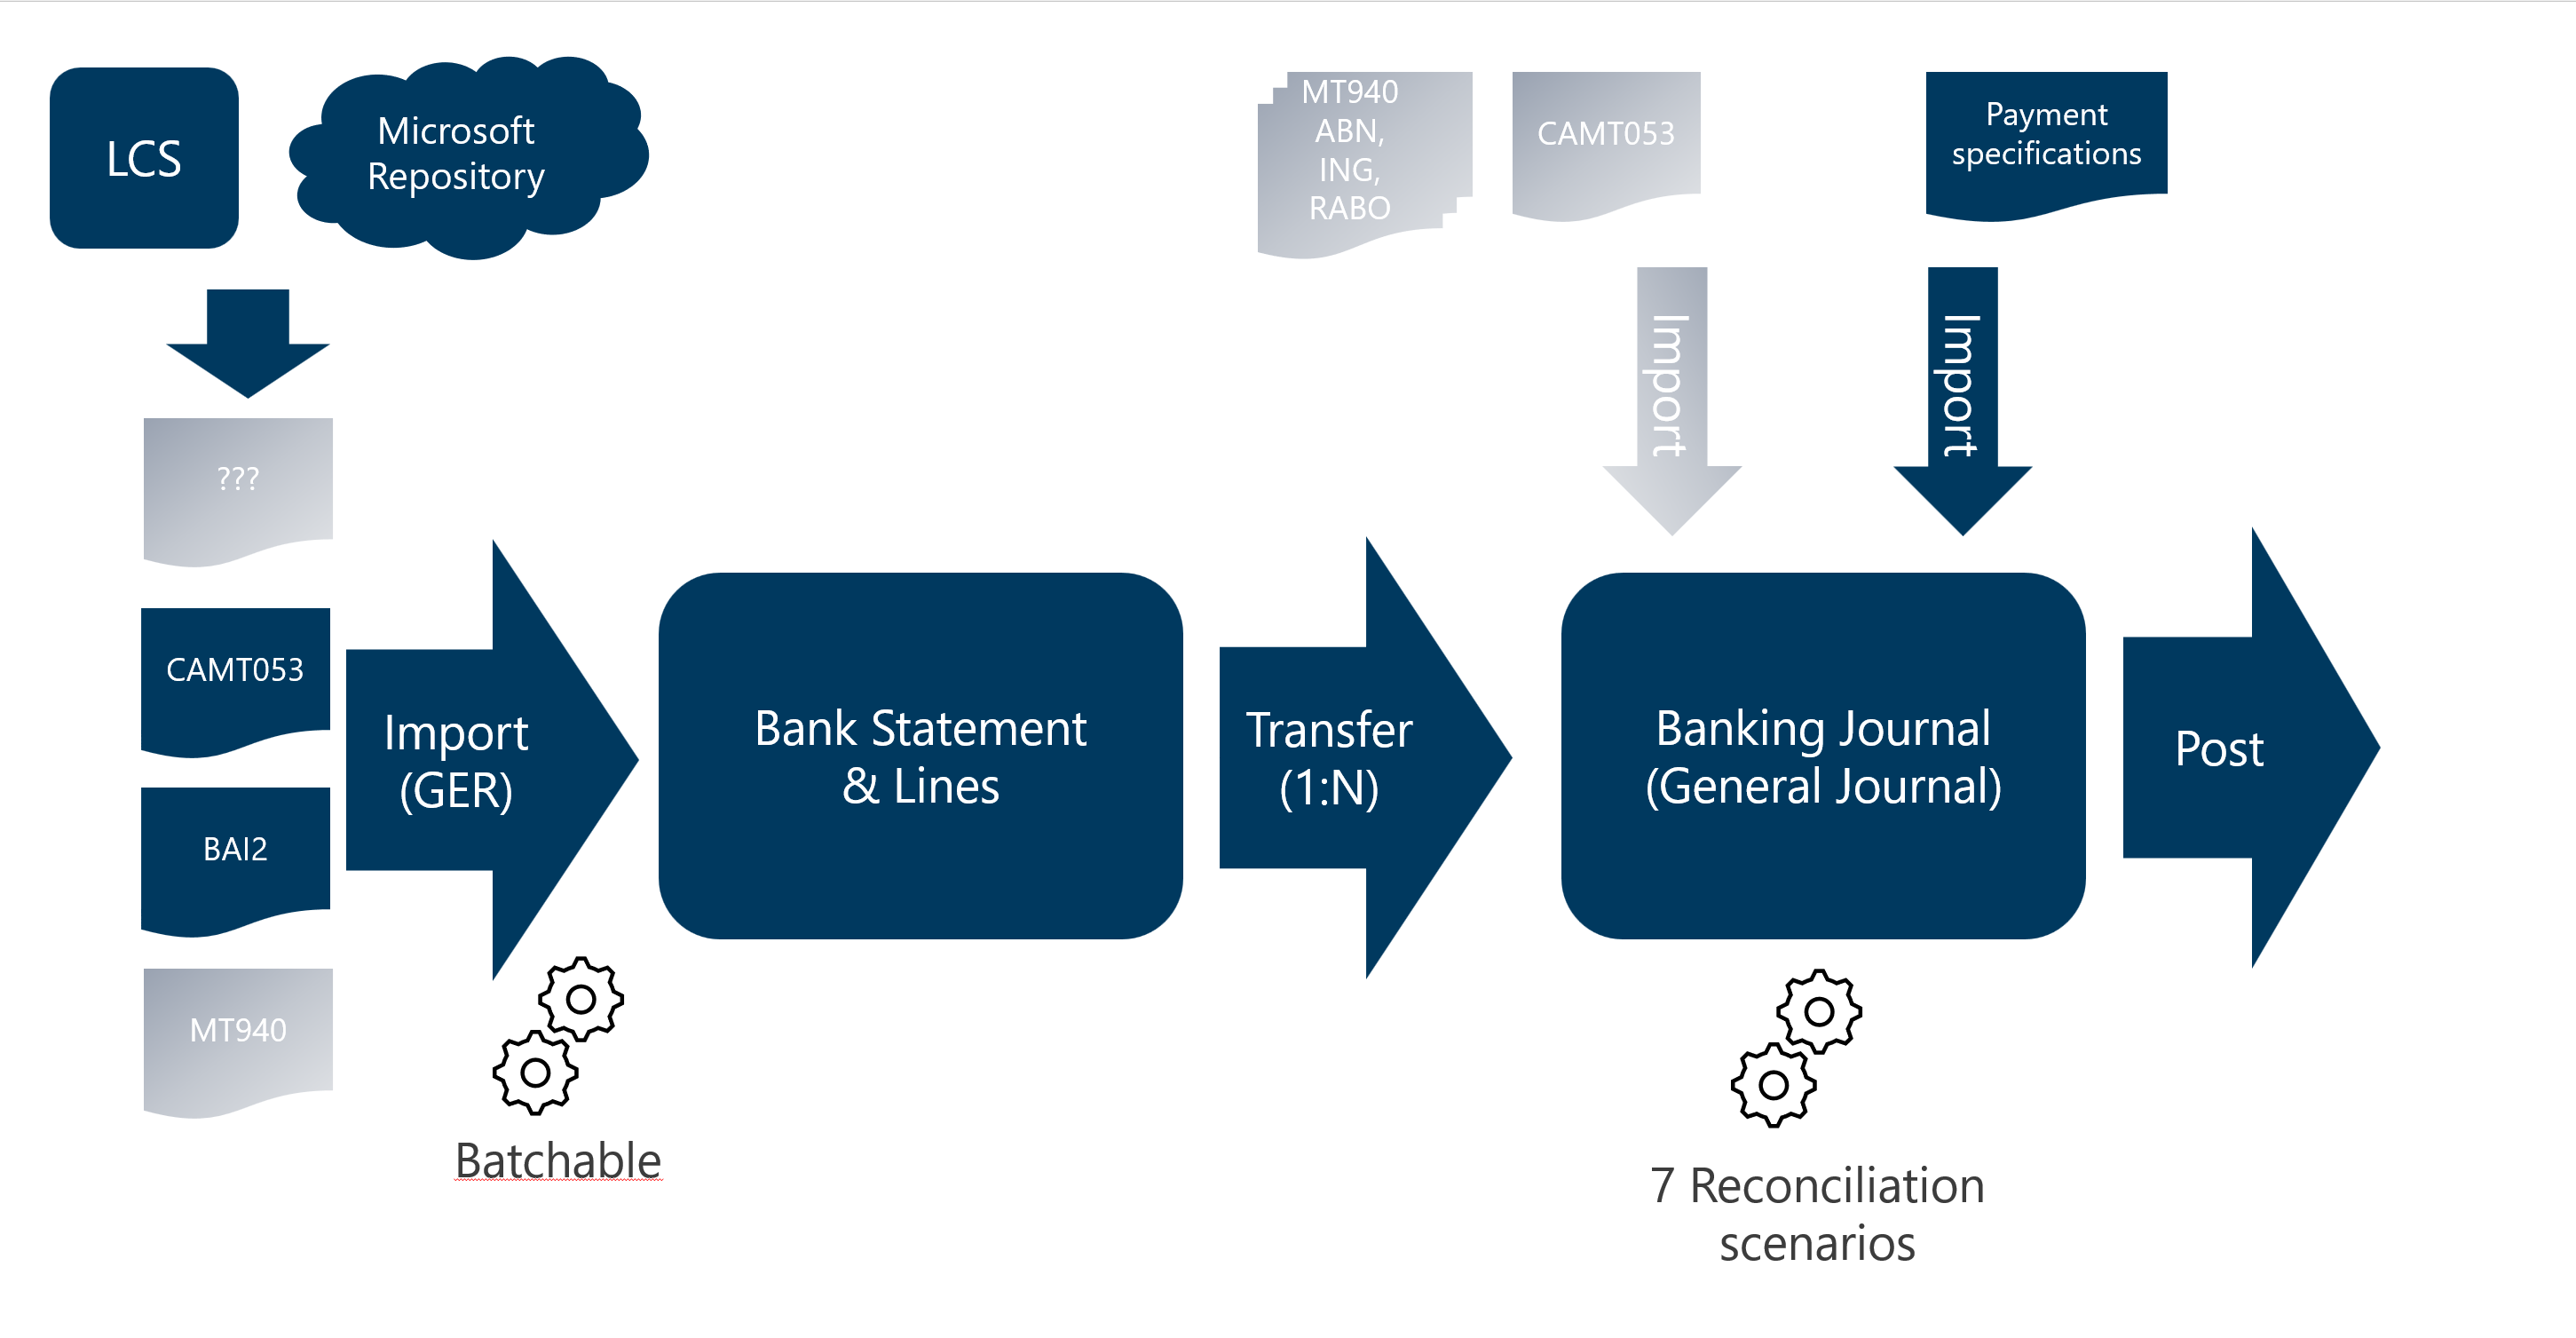
The primary process consists of these steps:
- Download a Bank Statement file from the bank. This can be a CAMT053, BAI2 or MT940 file
- In the Bank Management Workspace, import the Bank Statement using GER. This can be done manually, but you can also set up a batch routine that reads an Azure folder periodically
- Transfer the Bank Statement to a (set of) Banking Journal(s), which will create the journal lines and has the option to immediately assign lines to companies, customers, vendors or ledger accounts
- If desired, import a payment specification for a journal line
- Run the reconciliation function, which will execute the 7 main scenarios
- Manually add / correct settlements
- Post the journal
Almost every bank is able to provide their statements in an electronic format. Within the European Union, CAMT053 is becoming the norm, but MT940 is also still around. BAI2 is usually the format in the United Kingdom and (former) Commenwealth countries. More information on statement formats can be found here.
The Bank Management workspace is the best place to import the statements. Using Generic Electronic Reporting the various statement formats are mapped and the required data is brought into the Bank Statements. This can be done manually, importing a single file, but can also be scheduled. More information on importing Bank Statements can be found here.
After import, the imported data is visible in the Bank Statements. During implementation, consultants and users will use this as an intermediary step to validate the data. In a production setting, this step is usually skipped.
After reviewing / validating the imported Bank Statements, they are transfered to banking Journals. Large statements can be split into multiple journals, to facilitate efficient processing. Usually, users will specify that they want the data to be interpreted in this step and assign companies, customers, vendors and ledger accounts immediately.
Often already triggered as part of the Transfer, the reconciliation tries to interpret the data and searches for custmers, vendors and ledger accounts. And within those found accounts, it searches for open invoices that can be settled with the imported lines. Details of reconciliation can be found here.
In some cases, customers are paying multiple invoices and they send a detailed specification by email. Such a specification can be imported into a journal line. Here you can find more information on External Payment specifications.
When all lines have been taken care of, the journal can be posted. This will create the accounting transactions and update the Customer and Vendor transactions.
If Electronic reporting is used to import the statement, please find more details here. Although it is not the preferred way, it is still possible to import a statement directly into a general journal. In that case, use this setup:
General ledger > Ledger setup > Bank statement import methods for general journal
To enable the system to import Bank statements, the import method must be specified in the Bank statement import methods for general journal.
Create an import method and select e.g. “NL – SWIFT MT940” or “CAMT.053 Bank to Customer Statement” in the field ‘Import format’.
Fill the company’s own bank account number.
If Bank statements will be imported for multiple bank account numbers, create a separate import method per bank account.
The bridging account is the account for vendor payments or customer direct debits, that have been generated and posted, but have not yet cleared the bank. It is connected to the chosen bank account number.
Note
General ledger > Journal setup > Journal names
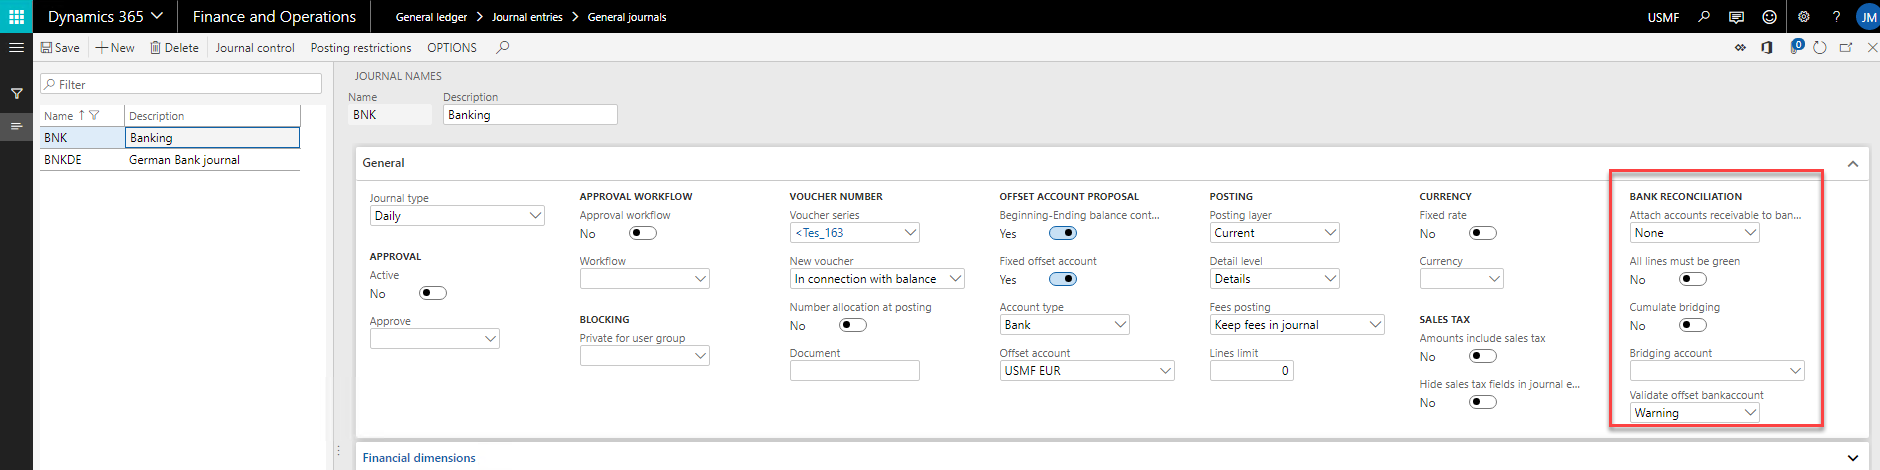
Create a new Journal name:
Note
In the form Bank reconciliation setup (General ledger > Ledger setup > Bank reconciliation setup) you can specify the overall working of the functionality.
The parameters are the same as the parameters found in Cash and bank management parameters.
On tab Bank Reconciliation Settings it is specified how the information in the payment description will be interpreted by the system. It is possible to define settings for all customers (Relation type = All), or to define customer / vendor specific settings (Relation Type = Account Number).
| Field | Description |
|
Method |
Which part of the file should be transferred to the payment note, in order to minimize the amount of irrelevant information:
If End is 0, import until the end of the file information. |
| Range text | Text that is used to specify a range, e.g. to in “invoice 12345 to 12349” |
| Infolog | Shows information about the invoices found to the user in the info log |
| Remove | Some irrelevant characters or words should be skipped during reconciliation process, or replaced by other words. Note: these irrelevant characters and words remain in the original note though. |
| Conform number sequence |
The numbers in the payment note will be extended to the length of the invoice number as specified in the formats listed. The extended numbers are derived from the invoice that was recognized last time. Important
|
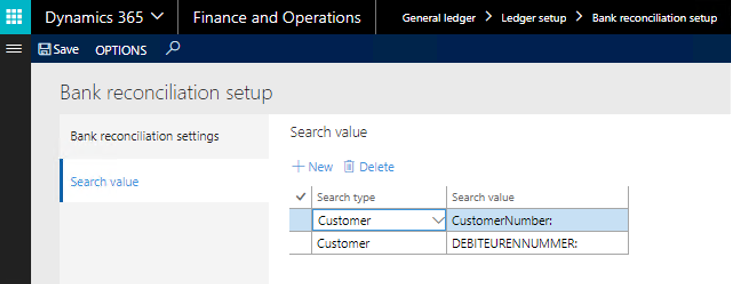
| Search value |
Not every industry uses invoice numbers to identify open transactions. People paying rent, insurance or other repetitive transactions, may only refer to their own customer-number. In the reconciliation setup, a section is available, allowing the user to specify which ‘tags’ help identify the customer.
In this example, tags ‘CustomerNumber’ and ‘Debiteurennummer’ both tell the system the next value is a customer ID. Note
|
| Test | To test a payment note, you can copy this in the Test Note box, and press [Test]. The info log will show how the data will be interpreted during import and reconciliation. |
| Enable split bank journals | If set, the user gets the option to specify in the Create Bank Journal dialog at which many lines the system should create a second or third Banking Journal. |
| Use banking journals | If set, a new menu item for Banking journals becomes available in Cash and bank management / Journal Entries. It also prevents using journals with a fixed offset account of type bank, being used in General Journals (they won't show in the list of journals, nor in the lookup of the journal names). This way we make a slightly easier on the users ("where are my Baking Journals, I don't want to work in a General Journal"), and allow ourselves to clean up the General Journal form. |
Tab Tracing allows the user to configure the Tracing settings. Tracing can be used to understand why the system find a customer/vendor and/or an invoice. As it consumes more resources, use it when needed. It does not have an effect on the way accounts and invoices are found.
| Field | Description | Remark |
| Enabled | Switches on/off the tracing in the current company |
|
Invoice Recognition |
This might help in understanding which information from the payment note is seen by the system as 'Invoice' | |
|
Invoice Search |
This might help to understand how the system finds the open invoices in the system. | |
|
Reconciliation |
This supports the understanding of the reconciliation process |
| Data Upgrade | |
| Centralized Payments company update | To be used when an existing company switches to centralized payments. |
| Bank statement status update | To be used if a company already uses standard Bank Statements and now implements Banking. It sets the status on existing Bank Statements (Posted, Journalized, etc) |
To keep the original order of the imported lines, an internal line number is assigned.
General ledger > Ledger setup > Payment terminals
| Field | Description |
| Payment terminal number | Identification number of the terminal |
| Account | Ledger account and financial dimension that will be set to the journal line when the payment terminal is found on importing a statement |
Cash and bank management > Setup > Cash and bank management parameters > tab: Bank reconciliation
The parameters are visible in both the Cash and Bank parameters, and the Bank Reconciliation setup. Over time, all parameters will be in the same place: ...
| Field | Description | Remark |
| Determine account |
This parameter determines which finding method will be executed first when importing the bank statement
|
Do not set this parameter to Invoice if there is no need for it, as this has a performance impact. |
|
Continue Search |
If selected, the system will continue to search for matches, if it can't determine a unique invoice, when only using the invoice number(s). |
Introduced in 1000.24.411.15843 |
|
Split bank statement # number of lines |
When the number of lines that are imported are higher than specified the journal will be split |
In every related journal the ending balance of the statement needs to be entered |
|
Reconciliation v2 |
Over time, the reconciliation function has been refactored. If you are a new customer, use the v2 version, and set this parameter to 'Yes'. If you have already been using the reconciliation for a while, and are happy with the results, set this parameter to 'No', and you will continue to use your familiar reconciliation, and keep getting the same results |
In the future, we would like everybody to start using the v2-version, so we can clean up the old code. But we're aware of the need to stay compatible, hence this option. |
|
Customer Email ID |
This email template is used to send to a customer with the specification of the invoices that will be collected via direct debits |
|
Customer csv attachment |
Option to add a csv file to e-mail of payment specification |
|
Vendor Email ID |
This email template is used to send to a vendor with the specification of the invoices that have been paid |
|
Vendor csv attachment |
Option to add a csv file to e-mail of payment specification |
Note
Note