
Product documentation
Service Management - DYS > Setup > Calls > Severity
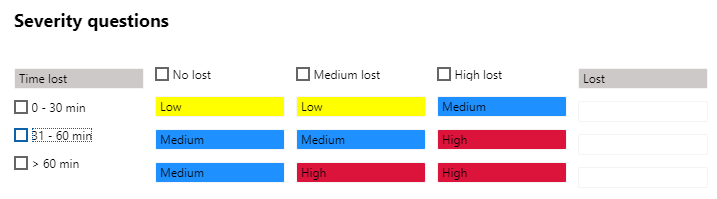
Instead of using standard dropdowns to determine the severity of the scervice calls, Service Management allows the user to determine the severity based on a severity matrix. The matrix can contain as well horizontal as vertical questions helping the user creating a servcie call to determine the severity of the service call. In the service call creation screen, the severity is defaulted based on the service call type or the matrix can be opened via the severity questions button.
Service Management - DYS > Setup > Calls > Severity configurations
| Field | Description |
| Version Table |
| Version | Unique ID for the version. This ID is based on teh number sequence as defined in the parameters |
| Description | Description of the version. This description needs to be added manually |
| Status |
Status of the version. In total there are 3 statuses. Deactivated, versions in this status are being used anymore, but will stay in the system since the use can also use it as a basis to create a new version. In addition on task level, it is always possible to review the version that was used during the work order creation, even if the version is no longer active. |
The button activate will change the status of the version to active. The active version is used whn creating al new service task.
The button duplicate will make a copy of an existing version for editing purpose. The status of this version will be new.
The button setup allows the user to determine the setup of the questions.
| Field | Description |
| Question type | Determine whether the questiong should be displayed either horizontally or vertically |
| Question | Description of the question |
| Lines |
| Answer | Here the user can list all the answers belonging to the question on left. Be aware that when using i.e. multiple vertical questions, the answer on the same line has the same outcome. This because ther can only be one outcome per vertical and horizontal combination. |
The button outcomes will show the matrix outcomes from the selected version.
Service Management - DYS > Setup > Calls > Severity > Question type
The questions used in the setup of the version can be entered manually in the version setup or the can be selected from the question type list.
| Field | Description |
| Question type | Determine whether the question should be displayed either horizontally or vertically. |
| Description | Description of the questions |
Service Management - DYS > Setup > Calls > Severity > Severity
The Service call severity table contains all the possible severities. These severities can either be used as default in the service call type setup or as outcomes in the severtiy version setup.
| Field | Description |
| Severity | Severity ID, short description of the severity. Typically one or two characters. This severity is shown in multiple forms. |
| Description | Description of the severity |
| Weight | Weight of the severity. The higer the number, the more important the severity. The severity with the highest weight will be selected in the matrix (based on the answers). |
| Contractor Response SLA | |
| Response time | Not applicable for this version |
| Response days | Not applicable for this version |
| Contractor Fix SLA |
| To fix time | Not applicable for this version |
| To fix days | Not applicable for this version |
| Color | This is the background color of the severity as shown in the matrix. |
Service Management - DYS > setup > Cockpitview
The cockpit overview contains financial and hour dat regarding the selected service call(s), service object(s) or service contract(s). Based on a data range an extensive reporting can be done to analyze margins and compare the with other periods. In the cockpitview it is possible to review data on a high level, but if needed it is possible to drill down to transaction level.
The grouping can be used for amounts and hours to group several categories ( for different transaction types) in the cockpit view.
In the servcie call, service object and service contract list pages, it is possible to view a cockpit overview (in the control tab). The cockpit overview is also available via the service call, service object and service contract details form (via the control ribbon).
Service Management - DYS > Setup > Cockpitview > Cockpit Amount Categories
| Field | Description |
| Overview ID | Short ID to identifiy the group. Define this as a logical name since this name will be shown in the cockpit overview |
| Overview Code | 1 letter code for the overview ID. |
| Name | Full description of the overview ID. |
| Interval |
|
From |
Select a category that needs to be part of this overview ID. All categories are supported. |
| To | This list can be defined line by line or a range of categories can be defined in the from and to range. |
Service Management - DYS > Setup > Cockpitview > Cockpit Hours Categories
| Field | Description |
| Overview ID | Short ID to identify the group. Define this as a logical name since this name will be shown in the cockpit overview. |
| Name | Full description of the overview ID. |
| Interval | |
| From | Select a category that needs to be part of this overview ID. All hour categories are supported. |
| To | This list can be defined line by line or a range of categories can be defined in the from and to range. |
Service Management - DYS > Setup > Warranty
Service objects can consist of numerous parts with all kind of warranty conditions. I.e. the warranty conditions on the mechanical parts can be different than those on the electronic parts or wear and tear parts.
It is possible to setup the warranty terms for object types and customers. It will be possible to specify which categories are applicable and what the conditions are. It is possible to setup different warranty terms for specific customer groups or object types. To make setup easier it is possible to setup terms for all object, specific object types and for a specific object. The same is the case with customers, it is possible to create terms for all customers, specific customer groups or a specific customer.
| Field | Description |
| Warranty Category | Unique identifier for the warranty category, |
| Description | Description for the warranty category. |
Service Management - DYS > Setup > Warranty > Customer warranty terms
| Field | Description |
| Warranty category |
Specifies the warranty category for the term. Lookup to the table described in the previous paragraph. |
| Object code type |
Select one of these options: All, Group or Table |
| Object relation |
Combined with object type code, leave empty for All, select an object type with Group, or object id for Table |
| Account code |
Select one of these options: All, Group or Table |
| Account selection |
Combined with relation code, leave empty for All, select an customer group with Group, or customer account for Table |
| Effective |
Specifies the date on which this terms became or becomes effective. It is possible to create warranty terms that will become effective in the future. When the object warranty start date is set the business logic will look at this field to determine if the term is active. |
| Expiration |
Specifies the date on which this terms expires or expired. When the object warranty start date is set the business logic will look at this field to determine if the term is still active. |
| Setup | |
| Warranty | |
| Warranty period |
Number of periods used to define the warranty period. |
| Period |
Specifies the type of period used to define the warranty period (day, week, month, quarter, year). |
| Warranty max. measure |
Maximum measure after which the warranty will expire. Currently no business logic is based on this setup. |
| Unit |
Specifies the unit in which the warranty measure is measured. |
| End of life | |
| Expected life period |
Number of periods used to define the expected life. |
| Period |
Specifies the type of period used to define the expected life (day, week, month, quarter, year). |
| Expected life max. measure |
Maximum measure on which the expected end of life will be reached. |
| Unit |
Specifies the unit in which the expected life is measured. |
| Exclude |
| Warranty call type check |
In some cases the warranty terms expire quickly (for instance wear & tear parts). This could result in marking the service call as non-warranty after a short period while another warranty terms might be valid for years to come. This checkbox excludes this term from the logic that is used to determine whether or not the warranty call type must be used instead of the default call type. Note that this check is only used for determining the call type upon service call creation, on the task transactions the validity of the term are always checked. |
| Project category | Hours - Costs - Travel - Fee |
| Project category |
The project categories selected are the ones that are covered by this warranty term. If you select one of the mention categories the system will ask you whether the category should be updated to the related warranty category to ensure that the warranty cost are posed against the correct category and P&L. |
| Warranty project category |
If the category from the first column is selected in a task the system will present a popup proposing to auto update the selected category to the related warranty category in this column. |
Service Management - DYS > Setup > Graphical planning > Schedule parameters
| Field | Description |
|
Tab General |
| Enable auto refresh | Enter description here |
| Scheduling overview | |
| Schedule starttime | Working starttime in scheduler |
| Calendar endtime | Working endtime in scheduler |
| Scheduling on non-applicable resources | Which action must be taken when scheduling is not applicable for the selected job. |
| Project Planning |
| Budget model | Select a budget model if applicable |
| Scheduling direction | How to schedule, forward or backward |
| Finite capacity | Only applicable if the grapical planner also will be used for production planning. |
| Production Planning | Only applicable if the grapical planner also will be used for production planning. |
| Colors | Colors that will be shown on the graphical planner |
| Color selection | Colors that will be shown on the graphical planner depending on planned orders, production orders or order type. |
Service Management - DYS > Setup > Graphical planning > Leave types
Typically the schedule of an employee will be filled based on the service tasks. In some case however you want to be able to block a timeframe in a calendar of a resource. This can be done with the leave types. The leaves van be assigned to a certain date / time via de scheduling overview.
| Field | Description |
| Type of absence | Unique code for the type of absence |
| Description | Description of the type of absence. This description will be used in the scheduling overview. |
| Project ID | Prject that will be used for its activities and project budget in order to be able to schedule time. |
| Activity number | Unique number of the activity that is linked to this absence type. The activities need to be created in the projects module. |
| Category | Category of the type hours that will be used for the hour budget line. |
| Line property | Line property that will be used for the hour budget line. |
| Color code | Color that identifies the type of absence. This color will be visible in the scheduling overview. |