
Product documentation
Product Search offers the option to display (context-related) on-hand information on the result card and even to filter on on-hand information (to check for availability in specific warehouses for example). There is however a big difference between the setup needed for displaying the quantity and the setup needed for filtering on it, which is why this topic goes into both options in detail.
With the help of calculated fields, it is possible to display the on-hand quantity on the Search result card. As the information is not stored in the index but retrieved (and calculated) straight from the system itself, the displayed quantity is always up to date, making the numbers extremely reliable, but this also means that they cannot be used to filter your result.
Filtering can only be done on data that is present in the index, which is why the calculated fields cannot be used for this purpose. It's also possible to write quantity-on hand data to the index for this purpose, including the location information. The reliability of the quantities used in the filters is a little lower and mainly depends on how often the information is refreshed in the index, but on the upside, with a filter it's possible to search for specific (minimum) quantities as well as for quantities in specific locations, making the search result more relevant.
We advise to combine both methods to get the best of both worlds: set up and use the filter to get the most relevant results for your search and display the calculated fields on the result card to double check the real-time quantity/location information.
Note
If search is up and running, then adding the quantity on-hand information is very easy by adding the on-hand quantity related Calculated fields to the Search layout on the hierarchy on the Search configuration. How to add a record to the search layout is described here.
For displaying the quantity on-hand there are two options available out of the box as part of the product. Both of these options can be found under the ProductSearch collection (which can be selected after a calculated field has been selected as the field type on the Search layout).
| Calculated field | Description |
| Qty | Calculates the on-hand quantity for the item for the site and/or warehouse on the order. If the context of the order is not known (when opening the search forms via the main menu), then it will show the on-hand qty for all warehouses (and thus the same number as the option below). |
| QtyOnHandCompany | Calculates the on-hand quantity for the item across all warehouses. This will give the total on-hand quantity that is available in the (active) company. |
When selecting one of the options above, the style will automatically be set to 'Link'. The effect is that on the result card, the qty amount shown is clickable, which will then open the on-hand inventory form. If this behaviour is not wanted, the style can be changed to 'Regular'.
Setting up the filter for on-hand quantity is a multi-step process. First some parameters need to be defined, then the setup has to be made to add the fields to the index (including the data upload) and finally the setup to display the filter has to be done.
Navigate to Product information management > Setup > Advanced search > Product search parameters and select the 'On-hand inventory breakdown' tab.
The settings on this tab determine which storage dimensions are used in the index. Records can be created with item code relation All, Table, Group or Category. If all is used, then only the storage dimensions have to be specified. For all other types either a specific item number, item group or category from a category hierarchy has to be selected on the record as well.
The storage dimensions are selected at the bottom of the form with the switches for the selected record. Any activated dimension will also display on the record in the storage dimensions field.
Note that in the index, when the fields will be created, they will get created for all dimensions that are selected over all of the records. So let's say for example you select 'site' for all records and 'site' and 'warehouse' for a specific item group. The fields site and warehouse will be created in the index and therefore available on all products in the index. But for the warehouse field, the values will only be filled in for the products that belong to the selected item group. For all other produts, the field will be there, but remain empty.
The settings in this form are company specific. If there is only 1 company in which this setup is made, no field is added to the index to indicate the company, to save on the amount of index fields needed. So if a multi-company setup is needed, we advise to set up these settings in at least 2 companies before updating the scheme (which is done after setting up the Custom search), so that the company field is included in the index. If a second company is added after initial on-hand fields were already added to the index, another scheme update is required, to have the company field added to the index field.
Navigate to Product information management > Setup > Advanced search > Search configuration and select the relevant Search configuration. On the Category hierarchies tab, select the relevant hierarchy and open it (by clicking on the hierarchy name or by using the 'Configure search hierarchy button', then scroll to the Custom search tab.
Add a new record and as the Custom search source select 'OnHandBySite'. Make sure to fill in the name for the index field in the Azure search field column (note that only lowercase is allowed in the index). This is also the name by which you will find the field when adding it to the Filter layout, so for the purpose of this help text, the name used is 'onhand'.
Now that both the inventory breakdown and the custom search have been setup, an update scheme needs to be performed for all indexes within the used Search configuration. The update scheme will create the fields in the Azure index for storing the inventory information. Note that this will be a composite field: an array with a main field name (given above, in this example 'onhand') and subfields for all the storage dimensions that have been set up, the quantity, the unit of measure, a description and (if relevant) the company.
Make sure to also Update the search data afterwards, for the actual inventory values to be updated in the index.
Navigate to Product information management > Setup > Advanced search > Search configuration and select the relevant Search configuration. On the Category hierarchies tab, select the relevant hierarchy and open it (by clicking on the hierarchy name or by using the 'Configure search hierarchy button', then scroll to the Search filters tab.
Now the the inventory filter can actually be added to the Search form, so that it is displayed and can be used.
Add a new record to the Search filters and as the Index field, make sure to select the main field, the actual composite field and not any of the subfields. In the mentioned example that is 'onhand' (so without a /xxxx, as that indicates the specific subfield).
The filter type will automatically be set to 'Composite with numeric value' and should be kept as such. Value ranges are currently not supported for this type of field and therefore cannot be filled in. The other fields work as described here, but note that for the inventory filter, the recommended value for the Filtering mode is 'All' (instead of 'Any'), as in most scenario's the desired result is that all parts of the inventory filter are combined - so filtering on a minimum quantity of 10 and site West with filtering mode 'All' will give you only items that have both the minimum quatity of 10 and are in site West. (With the 'Any' option the results would also include records that have any quantity in site West and any records that have a min. qty of 10 over all locations.)
Once the record exists and is saved, the 'Type configuration' button becomes availabe at the top of the tab. With the 'onhandfilter' record selected, click it so that a new pane opens where the content of the filter can be set up. Here the records need to be added for all of the parts that the filter should contain, using the subfields from the composite inventory field. As a minimum there should be a record added for the quantity field (which is the numeric mapping and with filter type Numeric) and a record for the site field (without a mapping and with type regular).
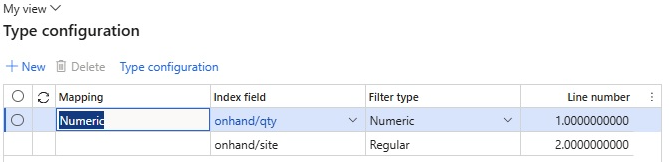
Note that for the numeric field, additional configuration is needed, so with the numeric record selected, click on the 'Type configuration' button on the pane. Another pane will open where you can set the 'from' and to 'value', that determine the minimum and maximum value of the numeric control, in this case the quantity being filtered on. Please note that filtering on zero is not possible (as standard D365 does not guarantuee that an inventory record exists for every item), so most likely the minimum quantity will be set to 0.01 or 1 (depending on what works best for the company scenario). The maximum quantity can be set to an unlikely high amount such as 999,999,999 or lower if that is relevant to your business. The Step field determines the amount used when using the up/down arrows for the quantity in the filter. So a step value of 1, means that whenever an arrow is used, the value is increased/decreased by 1. A value of 5 means increases/decreases of 5 etc. (and this works with decimals too).
If more parts are wanted in the filter, for the warehouse level for example etc., just add more records and select the desired subfield(s).
Now that the filter has been set up, the last step to complete is to Publish the definitions.
Important
It's possible to have the on-hand filter automatically applied based on the context from where the search form is being opened.
So if for example it's set up for a Sales order record with Site and Warehouse activated, then on opening the Product search form from a Saler order, the site and warehouse from the header will be automatically applied in the on-hand inventory filter. If the record here would only have Site activated, the filter would be set using only the site from the header of the Sales order.
Note that the filters applied via this setup are locked and cannot be removed on the search form, but additional on-hand options can of course be selected.
Currently the following (search) forms can be set up to use a context filter on opening:
Setting this up requires setup in 2 places:
Navigate to Product information management > Setup > Advanced search > Product search parameters and select the 'On-hand inventory filters' tab.
Add records here for all the places where an inventory filter should be applied on opening the search form and for each record select which dimensions should be set in the filter based on the provided context (currently only site and warehouse are supported).
The context that is used for the filter, depends on which dimensions are activated, in combination with the context provided by the selected record for that form (different forms can provide different context/dimensions).
Navigate to Product information management > Setup > Advanced search > Search configuration, select the relevant search configuration and scroll down to the Product search fast-tab.
For the filter to know which fields (from the index) to use for the filter, a mapping needs to be made. Under the header Mapped fields, the following fields need to be filled in:
| Field | Description |
| Index field On-hand | Open the drop-down list and select the field from the index that is used to store the On-hand information. Make sure to select the main field here; meaning the actual composite field and not any of the subfields. In the mentioned example that is 'onhand' (so without a /xxxx, as that indicates the specific subfield). |
| Index field On-hand quantity | Open the drop-down list and select the field from the index that is used to store the Quantity for the On-hand information. Make sure to select the subfield here that is specified as the quantity (and thus the numeric) field. Continuing with the mentioned example that would be 'onhand/qty' (or behind the / the index fieldname used for the quantity). |
| Index field On-hand site | Open the drop-down list and select the field from the index that is used to store the Site for the On-hand information. Make sure to select the subfield here that is specified as the site field. Continuing with the mentioned example that would be 'onhand/site' (with behind the / the index fieldname used for the site). |
| Index field On-hand warehouse | Open the drop-down list and select the field from the index that is used to store the Warehouse for the On-hand information. Make sure to select the subfield here that is specified as the warehouse field. Continuing with the mentioned example that would be 'onhand/warehouse' (or behind the / the index fieldname used for the warehouse). |