
Product documentation
With Report Management it is no longer necessary to extend the DP class for every field that has to be printed on the documents. Report Management comes out of the box, with the most used documents. On those documents, the Report Management document fields are available, which can be matched with all fields and methods from the concerning data sources.
Document data sources
Organization administration > Report Management > Document data sources
| Button | Description |
| Initialize |
After a Report Management document field is added or the data source has been changed, the data source has to be initialized. This can be done with the button Initialize. |
| Field | Description |
| Report Name | The actual document, e.g. Sales order confirmation or Sales invoice |
| Source type | Journal or Document |
| Data type | Shows where the data comes from, the header or the line. E.g. sales order header or sales order line(s) |
| Class name | The class where the data is extracted from |
| Method name | The available methods per document. |
| Table name | The available tables per document. |
Report setup
Organization administration > Report Management > Report setup
A short introduction of this form. What is the purpose?
| Field | Description |
| Print markup | Determines if and which additional charges are exported/printed. "None", "From Header", "From Lines" or "Both" |
| Print financial dimensions | Determines if and which financial dimensions are exported/printed. "None", "From Header", "From Lines" or "Both" |
| Document field | The field that needs to be populated and used on the document |
| Journal data source | The data source that needs to be populated and used on the document |
| Journal field | The field to use to extact the data |
| Journal method | The method to use to extract the data |
The available documents that can be mapped:
Mark up
Additional charges can be incorporated into the XML document, with the flexibility to include the charges from the header, lines, both, or none at all. The determination of this can be facilitated through the 'Print markup' parameter, eliminating the necessity to match specific fields.
The XML file will reflect the inclusion of additional charges in the following manner:
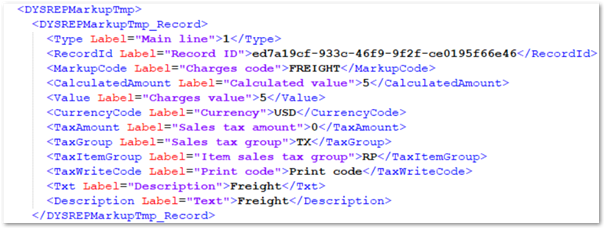
Mark up`s are available on the following documents:
In case Languages text have been setup for the charges codes, the value will be populaged into the <Txt Label="Description">
node, based on the language of the order header. If no Language text has been setup the value for this tag is fetched from the Description of the markup transaction, which equals the value in the node <Description Label="Text">. For sales invoices the language is based on the languages on the invoice journal header, which is inherited from the invoice account of the order.
Financial dimensions
The same principle applied to Markup is also used for Financial Dimensions. By utilizing the 'Print financial dimensions' parameter, it can be determined which financial dimensions will be included in the printout (export), whether from the header, lines, both, or none.
The output will follow a similar format as Markup, presented in a distinct node. However, if the parameter is configured as 'None', no export of financial dimensions will take place.
Financial dimensions feature is available on the following documents:
Logistics postal address
The logistics postal address feature streamlines the export of address data by automatically including the entire address node when linking the DYSREPDlvPostalAddress. This eliminates the need to individually link separate fields such as Street, Country, and City. This feature enhances efficiency by exporting the complete address node in one step, simplifying the management of address information.
This feature is available on this documents:
Translations
In Finance and Operations (F&O), certain reference data incorporates Translation functionality. This allows for the description of elements, such as Cash discount, to be provided in multiple languages. Depending on the language preferences of the customer or sales order, the system utilizes the relevant language. The translations feature within the Report Management product ensures that the appropriate language is exported to the XML file.
Open in Excel
The "Open in Excel" functionality, a default feature in Microsoft, is also accessible within the Report Management tool, entity: “Report Management data source mappings”. Notably, there is no constraint on mapping, allowing the linkage of a Document field with any Journal data source and Journal field. Our recommendation is to perform the mapping of all fields once, export the setup, and utilize it in new implementations. In the new implementation, the only necessary action is to verify the fields to be used and import the file.
Initialize
When a new document field is added to the Report Management Tool or the data source is modified, it is essential to initialize the data source. This can be accomplished by utilizing the 'Initialize' button. Therefore, we recommend using the 'Initialize' function each time before commencing field mapping or making any setup changes.
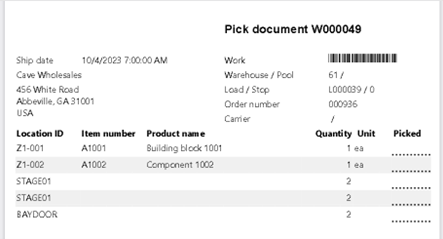
Pick document
Warehouse management > Work > All work / Work details > tab Work : group Print : button Pick document
Similar to the standard work report, but with a practice oriented layout incl. the customer name and address, pool, ship date, carrier and service.
When printed, an indicator is set on the work header to avoid double printing by mistake. Reprint is possible if needed.
No setup required.
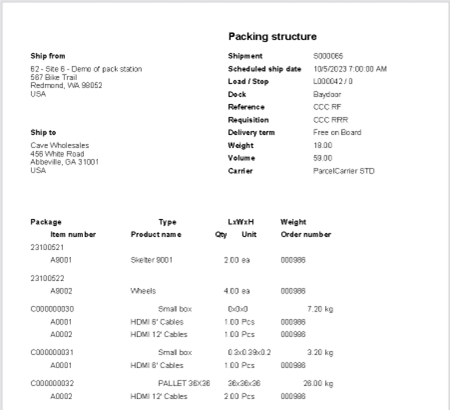
Packing structure
Warehouse management > Shipments > All shipment / Shipment details > tab Shipments : group Print : button Packing structure
Warehouse management > Loads > All Loads / Load details > tab Loads : group Print : button Packing structure
Similar to the standard packing slip, but structured per package.
A package can be a target license plate (with the work lines on it), and a container (with container lines filled on the packing station)
When printed, an indicator is set on the work header to avoid double printing by mistake. Reprint is possible if needed.
Required setup: Warehouse management > Setup > Warehouse management parameters > tab Print management
Setup the documents Packing structure for load and/or Packing structure for shipment.
Trigger for automatic printing of the packing structure (beta)
Warehouse management > Setup > Work > Work templates > button Report configuration
Go to the first put line on the work template for sales picking or transfer picking. This can be a put to a Staging location or a put to the Baydoor.
In that work template line, it is possible to setup Report configuration.
Create a new record, select the report Packing structure and choose the scope:
Now press the button Print settings to define to which printer and / or print archive the document should be printed.
Note
| Question: | What is the reason that a field is not populated in the XML file? |
| Answer: |
Temporary tables could cause an issue, because the temporary records are not deleted. This could happen when reprinting the same document. To solve this issue, empty the concerning temporary table. |