Product documentation
From the home page of the app, the button Tasks will open the 'Day view' task list form. This form can be considered as the pivotal form for all operations related to the completion of service tasks. There are four different task list forms, which are described below.
Each service task, which has not been excluded from Mobile Field Service, in the status 'Scheduled' and which is assigned to the engineer, will be displayed in the engineer's app. Service tasks may appear or disappear from the task list according to the upadtes and re-assignments of service tasks in the Microsoft Dynamics 365 for Finance and Operations back office.
The task list 'Day' shows the service tasks assigned to the engineer, which are due today. Self-created service tasks also appear here. The view shows details such as task number, customer name, address, task description, start time and severity.
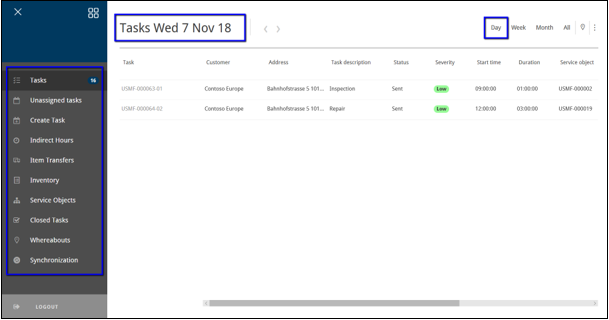
By clicking on one of the lines, the selected service task will open in the service task details form, and the service task can be started.
The user can view another day's task list by adjusting the date viewed at the top left corner. Each task list view has a left menu bar with the options that are also availble in the home page (except option settings). There is one additional option, Closed Tasks, which will display all service tasks that the engineer has completed on this device. This option is not available on the home page.
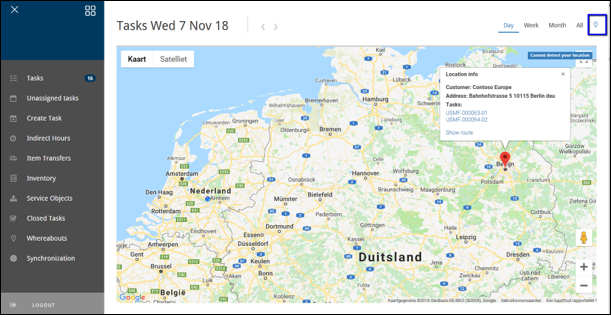
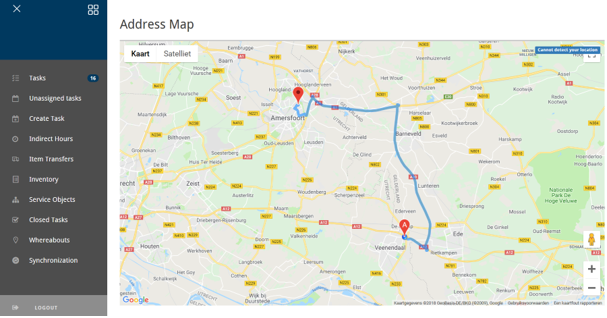
When 'Show route' is selected, the route from current position to the selected task will be displayed.
The view view allows the engineer to see their weekly schedule of assigned task. Each block represents a task. It shows less task details, but is great for looking at occupied date- and time slots and possible double bookings.
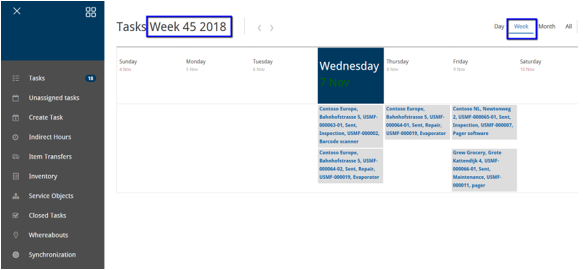
The default view is today's week. Engineers can scroll week back or forward using the arrow buttons or go back to today's week.
By clicking on one of the blocks, the selected service task will open in the service task details form and the service task can be started.
The month view allows the user to see tasks in the future and see the workload per day of the month. Each bullit represents a task and when selecting a specific day, the bullits will open and show the relevant task information.
The default view is today's month. Engineers can scroll months back or forward, using the arrow buttons.
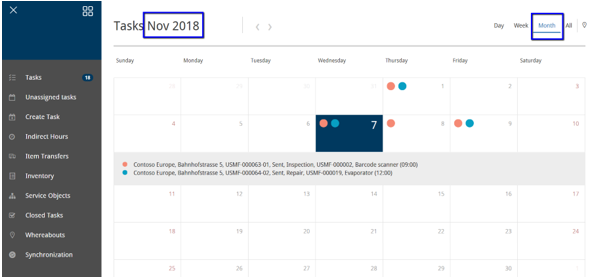
By selecting one of the bullits, the selected service task will open in the service task details form and the service task can be started.
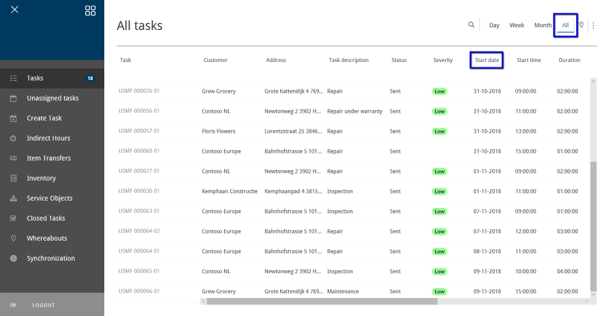
All view
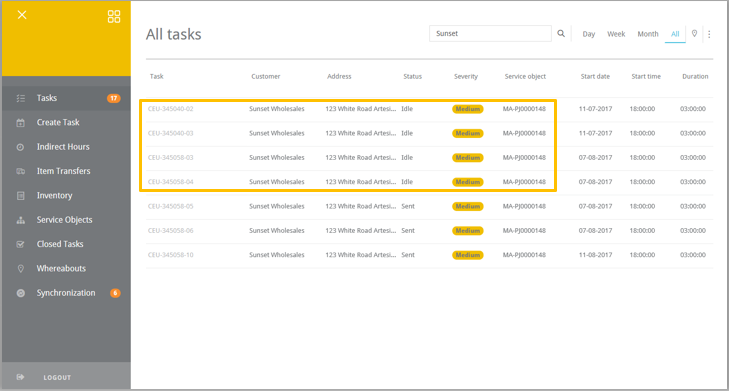
The task list 'All view' displays all service tasks on the device that have not yet been completed. The service task can be completely new (status Sent), paued (status Idle) or ongoing (status Traveling or Executing).
Note: In the All view, the start date indication is in the overview list as a seperate column.
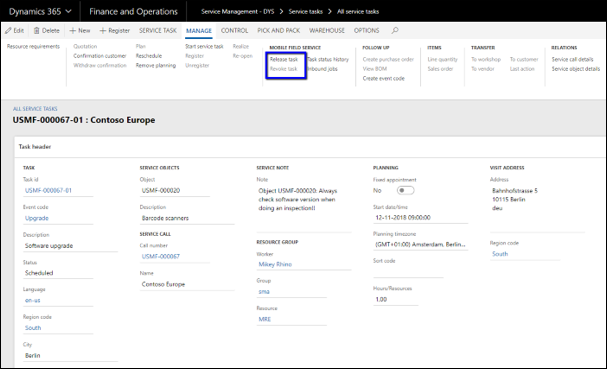
Based on the parameter 'Send scheduled tasks directly yo MFS' in the MFS Parameters, it is determined if scheduled service tasks are being triggered for MFS immediately after being scheduled in Microsoft Dynamics 365 for Finance and Operations or if the Release functionality will be enabled.
When the parameter is set to 'No', the release button will be available on the service task. This means that after scheduling the service task, the 'Reease' button will be enabled in Microsoft Dynamics 365 for Finance and Operations to release the service task to MFS.
This functionality can e.g. be used in case of a situation where multiple service tasks are scheduled during a day, while during the day the tasks still might be rescheduled to different engineers. Once the complte schedule is fixed, the planner needs to release this selection of service tasks in one action, e.g. all service tasks scheduled for the next business day.
If the parameter is set to 'Yes', this will not be possible. In that situation, ince the service task is scheduled, the trigger will be executed, and the service task is sent to MFS immediately. If changes in planning occur, service tasks are already sent to MFS and need either be rejected by the engineer in MFS, or revoked by the planner in Microsoft Dynamics 365 for Finance and Operations.
The release function is available:
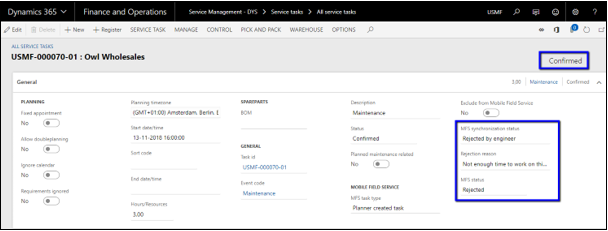
In case of a situation that a service task needs to be replanned or an engineer is e.g. sick, the service task can be revoked by a planner in Microsoft Dynamics 365 for Finance and Operations. Note that a service task can only be revoked if the engineer has not yet started working on the task.
By selecting the 'Revoke' button, Microsoft Dynamics 365 for Finance and Operations will create a delete message, which is sent to MFS. Secondly, it will immediately revoke the service task in Microsoft Dynamics 365 for Finance and Operations and set the status back to 'Confirmed', which means the service task can be rescheduled.
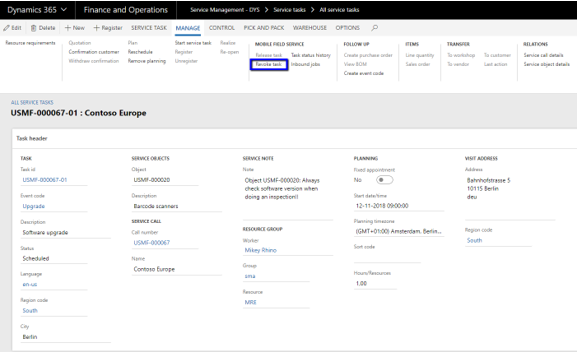
Note that the service task for the initial planned engineer will be only deleted from the engineer's task list in MFS, when MFS has been synchronized.
Another way to 'cancel' a service task is when the engineer triggers a rejection from his MFS device.
For example, when a task is inconvenient or impossible for the intended engineer to perform, the task can be rejected at any time before task execution. The ‘Reject’ option can be selected in the yellow menu bar at the right of the task detail form. Note that rejecting is only possible when no time has yet been registered on the service task.

Rejecting causes the service task to be removed from the task overview and the Engineer’s schedule. A rejection reason must be entered by the user in order to be able to reject the task.
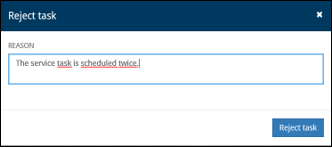
This information will be sent back to the service task in the Microsoft Dynamics 365 for Finance and Operations back office and the status of the service task in Microsoft Dynamics 365 for Finance and Operations will be set back to Confirmed. The rejection comment is stored in Microsoft Dynamics 365 for Finance and Operations in a separate field in the service task as well as in the progress note of the service call.
The primary purpose of Mobile Field Service is the ability to process service tasks on a mobile device. The service task on the Mobile Field Service app has several tab pages, all with its own purpose and information. In this chapter, we will explain the functionality of the different service task options.
Details
The details page shows information sent from the Microsoft Dynamics 365 for Finance and Operations back office to the mobile device, which is relevant for the completion of the task.
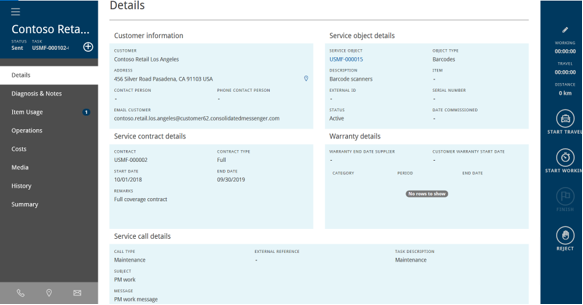
Note that the details page os for information purposes only, and none of the fields are editable. The service object number has a hyperlink to the service object form.
A task can be started from the task details page, after selecting it from the task list. The details form is characterized by four sections:
A grey menu bar at the left with different functionalities to be performed on a service task
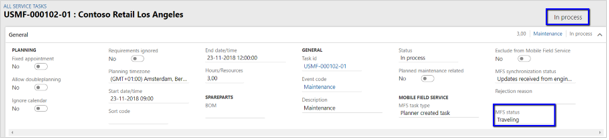
Once a service task has been selected from the task list, there are two ways to start a service task: start by traveling or start by working. The chosen action depends on whether the Engineer needs to register travel time and distance.

Starting a task by selecting Start Travel will trigger the following changes to the related service task in the Dynamics Microsoft Dynamics 365 for Finance and Operations back office once the XML message is processed there:

Starting a task by selecting Start Working will trigger the following changes to the related task in the Microsoft Dynamics 365 for Finance and Operations back office once the XML message is processed there:
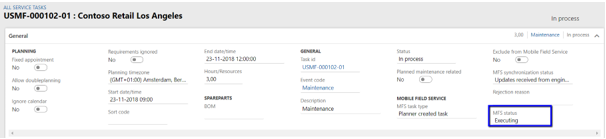
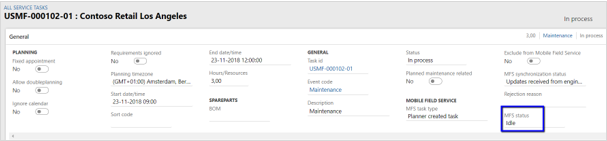
When either travel time or working time has been registered against a service task, but the timers are stopped, the mobile status of the service task will be changed to ‘Idle’.
The functions Start Travel and Start Working are explained in the following two paragraphs.
Start Travel
If a service task requires traveling, the task can be started by selecting the 'Start Travel' button in the right menu bar of the task details form.
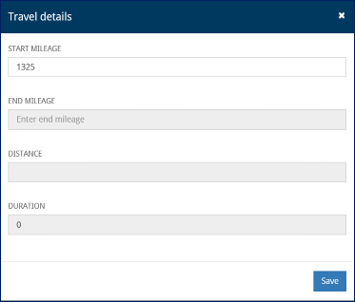
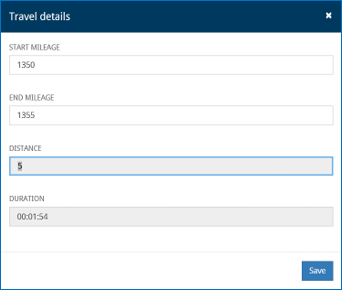
Fill in the starting mileage and press save to start the travel timer.
The travel button becomes ‘dark’ indicating that the travel timer is running, and the description is changed to ‘Stop Travel’. The timer of the travel time is visible as well.

By selecting either ‘Stop Travel’ or the button ‘Start Working’, the end mileage details form must be entered. The field distance will be calculated automatically and until the ‘save’ button is used the duration of traveling will keep running.
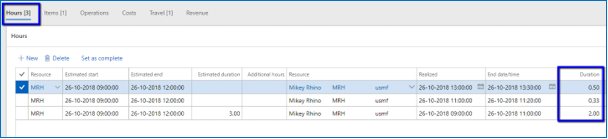
The travel information will be synchronized to the related service task in the Service Management module in Microsoft Dynamics 365 for Finance and Operations after the task has been finished in MFS. The registrations will be posted into both the ‘hours’ as well as the ‘travel’ transactions of the service task:

The user can start the task by selecting the button ‘Start Working’ in the right menu bar of the task details form.

By selecting the button ‘Start Working’, the timer will start recording working time. Note that once a timer is running, it is not possible to start travel or working time on a different service task. The engineer should first stop the timer before he is able to start a different service task.
Travel and working time registrations can be started and stopped more than once and the total time and distance will be summarized. Further, by directly selecting the ‘Finish’ button, stopping the timer will be triggered as well.
The working time will be synchronized to the related service task in Service Management module in Microsoft Dynamics 365 for Finance and Operations after the task has been finished in MFS. The registrations will be posted into the ‘hours’ transactions of the service task:
Note that project category and chargeability of hour and travel hour registrations cannot be controlled by the MFS engineer but are controlled by settings in the Microsoft Dynamics 365 for Finance and Operations back office.
As of MFS3.1 the Diagnosis and Service Notes forms have been combined into a single form. In earlier versions these functions were split over two separate forms. As of MFS3.3 all sections are placed below each other for easier scrolling.
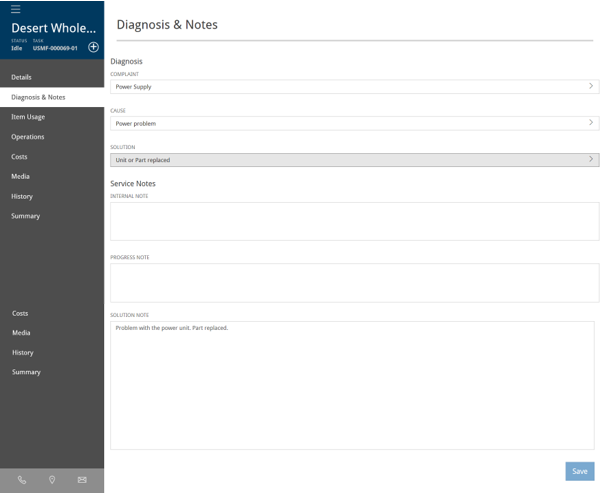
The service notes part of the form displays information from the related service call notes. The user can add notes to each of three fields: Internal note, Progress note and Solution note. Each field is editable and will be updated in the back office after task completion and message processing. Previous notes information related to the call are displayed above each editable field and have blue background.
The diagnosis allows the user to view and edit the complaint, cause and solution code of the service task. The complaint, cause and solution codes that are displayed could be dependent of the object type from the service object in the service task. This means that not every complaint, cause or solution code might be displayed here, it depends on the setup of the Diagnostic tree functionality in Microsoft Dynamics 365 for Finance and Operations.
For explanation of the diagnostic tree setup, we refer to the hyperlink [Dynamics Software Implementation Guide for DYS].
The item usage tab shows the user the item transactions for the service task. There are 4 types of item transactions possible:
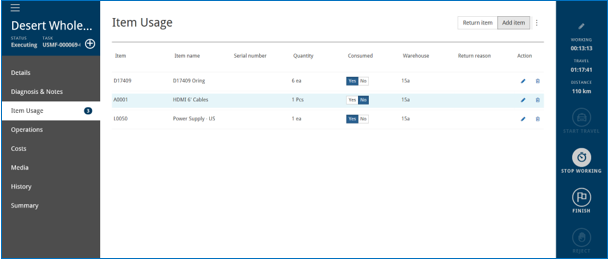
Transactions registered by the engineer can be edited or deleted, using the icons, before synchronisation is started.
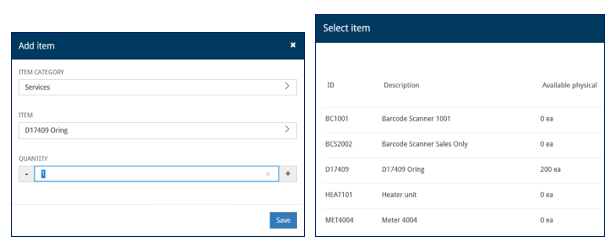
For adding items, a pop-up form will appear. To add item(s):
The items that are used will be synchronized to the related service task in the Service Management module in Microsoft Dynamics 365 for Finance and Operations after the task has been finished in MFS. The registrations will be posted into the ‘items’ transactions of the service task:
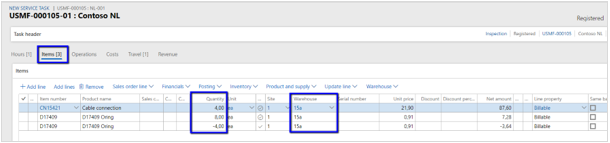
To register item returns on the service task the option ‘Return Item’ can be selected. Note that when an Item Return is added to the service task this way, it will create a negative item (sales) line in the service task in Microsoft Dynamics 365 for Finance and Operations. The item (sales) line will be posted to the warehouse that is defaulted on the item (sales) line in Microsoft Dynamics 365 for Finance and Operations.
In addition, the return item pop-up has an ‘Item return reason’ field. This field displays a list of values that are setup in Service Management.
Note that when returning items via Item Transfers, available in the main menu, a different procedure is followed. The item transfer functionality (inclusive return items) will create transfer orders directly in Microsoft Dynamics 365 for Finance and Operations. The functionality of the different return reasons in combination with item transfers is described in paragraph Item Transfers.
For items returned via the service task, negative item (sales) lines are created in the Microsoft Dynamics 365 for Finance and Operations service task. Depending on the type of return a follow up process is applicable. Transfer orders will be automatically created in Microsoft Dynamics 365 for Finance and Operations for the follow up processes ‘Transfer to main’ and ‘Transfer to repair’.
The transfer order is created in status ‘Shipped’ and should be processed in order to transfer the item from the engineer’s van to the relevant warehouse (Main or Repair).
For the follow up process ‘None’, to be used for example for returning items to the engineer’s van, no transfer order is created which means the quantity is directly posted to the warehouse of the item (sales) line in Microsoft Dynamics 365 for Finance and Operations (which is the engineers’ van warehouse).
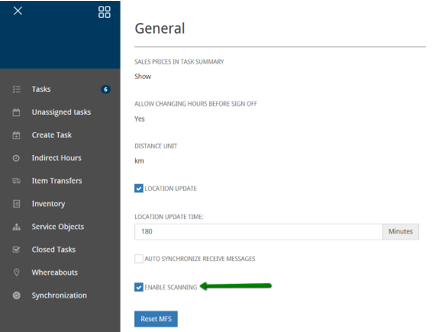
When parameter 'Enable scanning' is set to 'Yes' in section 'General' of the settings, it is possible to scan the barcode of items and service objects. In the relevant lookups a scanning button will be available.
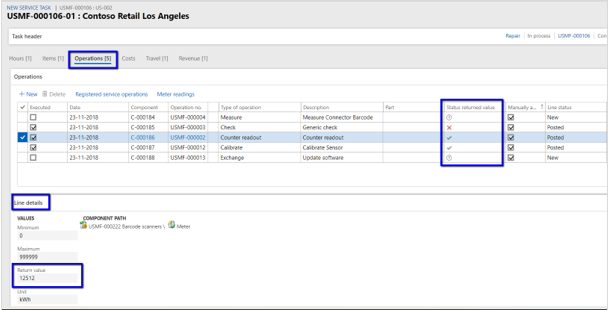
When a service task has operations in Microsoft Dynamics 365 for Finance and Operations, the operations will be sent to MFS too. The engineer can register the return values in the 'Operations' tab of the service task.
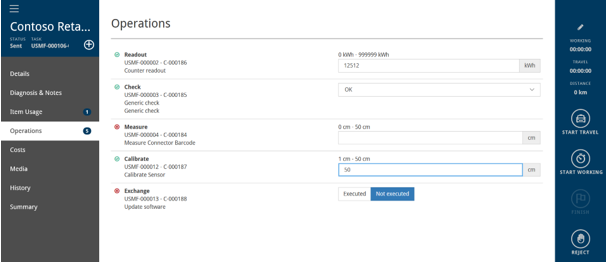
The return values of the operations can be filled directly in the above form. Depending on the type of operation, different fields will be displayed. The return value should be entered and saved in order to register the operation.
The operation registrations will be synchronized to the related service task in the Service Management module in Microsoft Dynamics 365 for Finance and Operations after the task has been finished in MFS. The registrations will be posted into the ‘operations’ transactions of the service task:
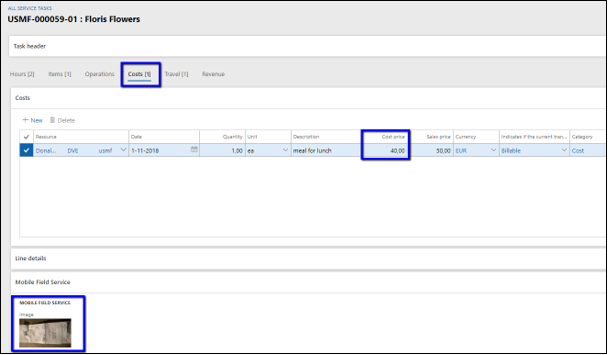
Cost transactions can be viewed or added on the ‘Costs’ tab of the service task. For each cost, a category, price, quantity, description, date and line property are shown. The category drop-down corresponds to the setup in the Microsoft Dynamics 365 for Finance and Operations back office.
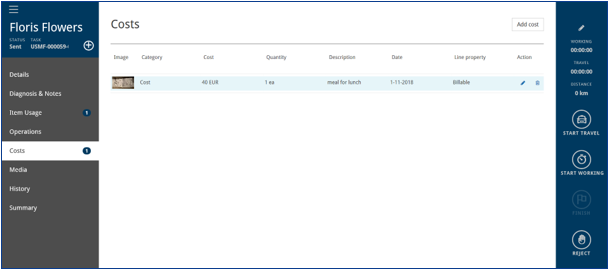
For the cost records the following information can be registered, which will be synchronized to the back office:
- The cost category indicating what type of costs
- The amount
- The quantity
- The unit
- The line property which indicates chargeability yes or no
- A description
- A date
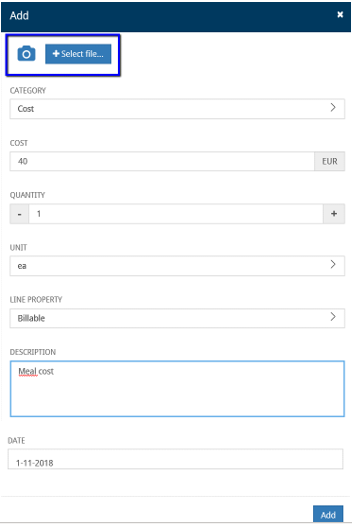
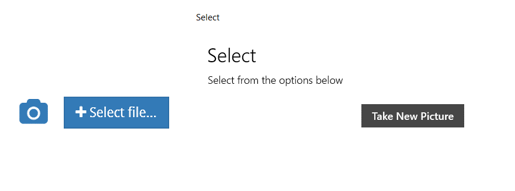
Optionally, a picture can be added (for example a payment receipt):
- by selecting a file from the device’s image gallery, or
- by taking a new picture. This functionality integrates with the device’s camera.
Add costs and the picture:
The cost registrations (and files) will be synchronized to the related service task in the Service Management module in Microsoft Dynamics 365 for Finance and Operations after the task has been finished in MFS. The registrations will be posted into the ‘costs’ transactions of the service task:
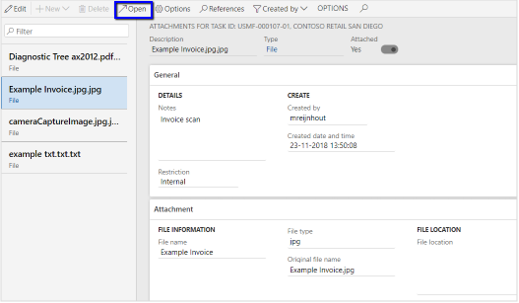
The Media tab allows the user to attach (and record) images, audio, video or any other files to the tasks. This functionality integrates with the device’s file gallery, camera and recorder. For each type, the date is saved, and comments can be added by the user.
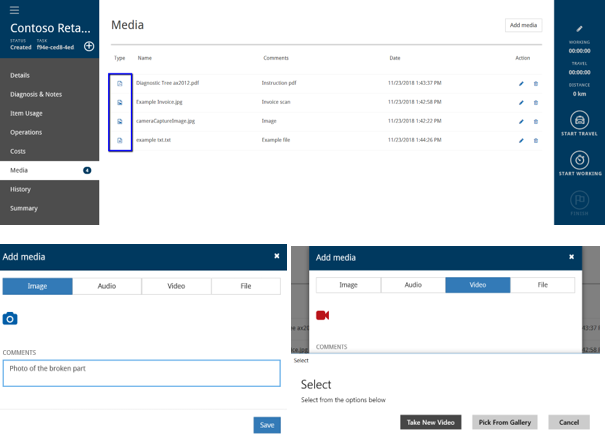
Files can be attached as a document attachment in a service task. Both type ‘File’ and ‘Note’ are supported for sending to MFS. A file of type Note will be converted into a txt file while sending to MFS.
Files which are sent from Microsoft Dynamics 365 for Finance and Operations to MFS cannot be removed and are not editable. The files can however be selected and will be opened in the relevant app on the device. For example, if a PDF file is attached, the device should have a PDF reader installed in order to open the file.
The other way around, additional to uploading images, audio and video it is now possible to upload files from the device into the MFS task as well. These uploaded files can be edited and deleted if required before the task is finished in MFS.
Once MFS is synchronized with Microsoft Dynamics 365 for Finance and Operations, the attachments are added to the inbound jobs.
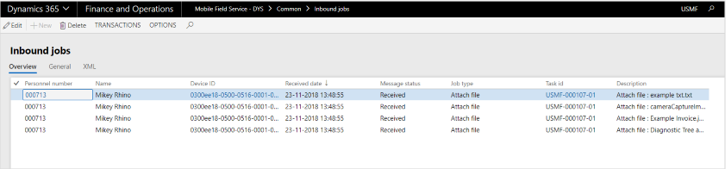
These inbound messages need to be processed in order to attach them to the service task. This can be done by batch job or done manually by starting the process inbound jobs function. This changes the message status from received to completed.

Once processed, the paperclip on the service tasks shows how many attachments are available.
Note that it is possible that MFS files which are uploaded are not (yet) defined as allowed file types in Document Management Parameters of Microsoft Dynamics 365 for Finance and Operations. In that case, processing the Inbound job will run into an error and first the file type should be added in the parameters.
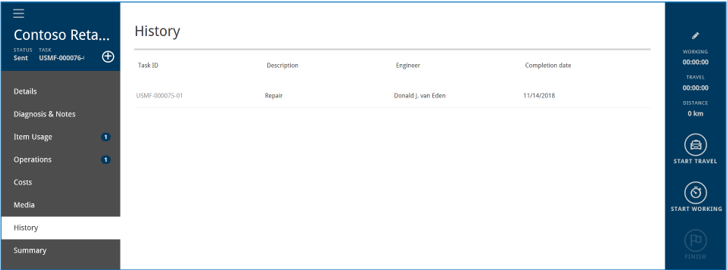
The History tab shows a list of previous service tasks performed for the selected service task. The list page shows task ID, description, engineer and completion date.
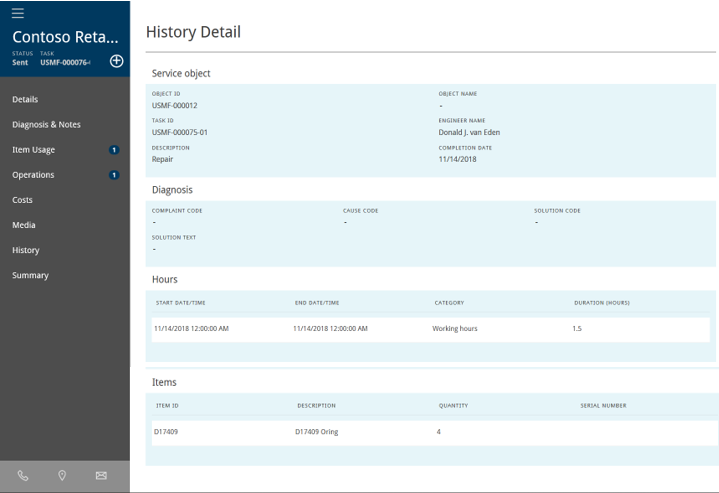
When a record is selected, more details of the task are shown: service object information, engineer, task description, diagnosis, hours and items.
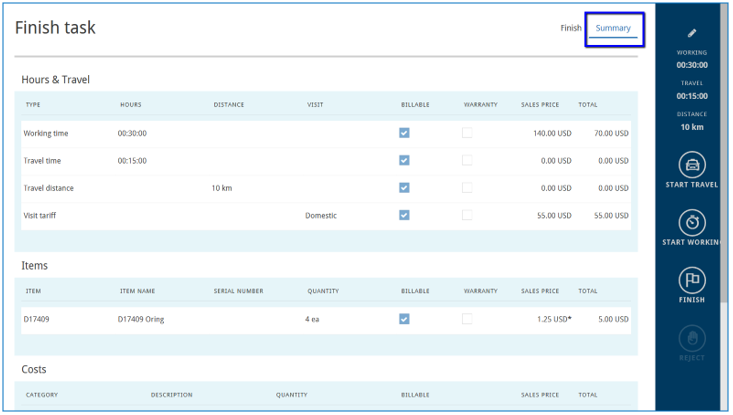
The task Summary form can be used by an engineer to show the customer an overview of the total registered transactions on the service task.
The task summary overview displays:
- Travel and working hours
- Travel Distance
- Visit tariff
- Used materials
- Registered costs
- Solution code and solution text
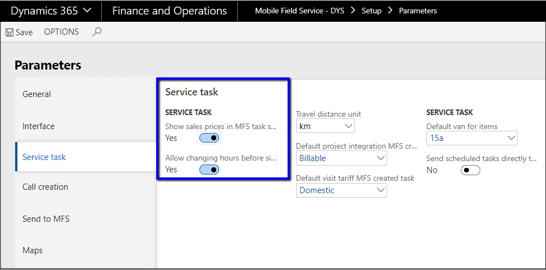
Based on the MFS parameter ‘Show sales prices in MFS task summary’ sales prices will be visible in the summary overview. This parameter is centrally set in Microsoft Dynamics 365 for Finance and Operations and cannot be changed by an individual engineer.
Note that the prices in the summary overview are collected from different entities from Microsoft Dynamics 365 for Finance and Operations and from MFS.
- Hour sales prices are transferred via the service task in Microsoft Dynamics 365 for Finance and Operations based on beforehand.
- Travel hour sales price, visit price and distance price are transferred via the Visit Tariff code from the service task and if not present via an MFS parameter
- Item sales prices are transferred via the service task if the items were entered on beforehand in the service task
- When items are entered in MFS itself, so by the engineer, the sales price will be taken from MFS which is always a standard sales price list (Gross price -/- Discount). Note that these standard sales prices are transferred to MFS on initial load and triggered by a batch when sales prices are changed in Microsoft Dynamics 365 for Finance and Operations.
Note that the summary is displaying sales prices exclusive VAT. Further, there is always a possibility that the Microsoft Dynamics 365 for Finance and Operations sales price transactions and therefore the service task invoice might differ from MFS after transaction have been processed in Microsoft Dynamics 365 for Finance and Operations.
For that reason, the MFS summary overview needs to be interpreted as a proforma document which is clearly labelled at the bottom left of the form: Total price (proforma).
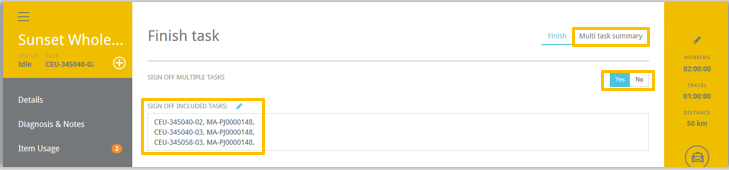
The engineer can access the Summary form, from the Finish task form as well.
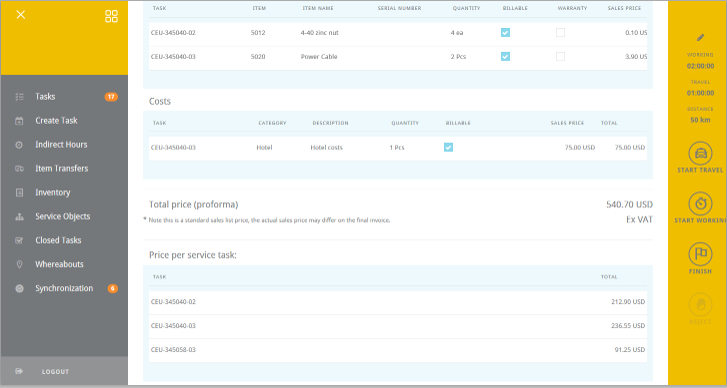
Multi task summary is enabled when ‘Sign off multiple tasks’ is selected (for an explanation of this function, see paragraph Finishing Service Tasks).
After selecting the form Multi task summary, the transactions of the selected sign off tasks are being presented in the form. The column ‘Task’ has been added to indicate for which task the transaction is. The different sections such as Hours & Travel or Costs are sorted by task.
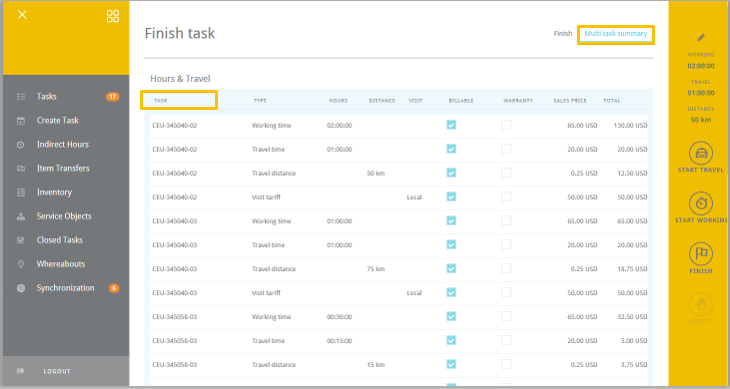
At the bottom of the form the ‘Total price (proforma)’ is calculated for all selected tasks. Further, for each individual task the price is calculated as well (under same conditions, Ex VAT)
Finishing a service task should be done when all relevant transactions and additional information have been registered and the task is completed. Note that after finishing, the service task is removed from the task overview and the Engineer’s schedule, so there is no way back for an engineer to add or adjust task registrations anymore.

Once the engineer is confident the task is completed and registered correctly, the task can be finished. When the engineer selects the ‘Finish’ button, the ‘Finish Task’ form will be shown where the customer should sign for the work performed.
Adding the signature is mandatory for finishing a service task. Additional comments can be entered as well and are synchronized in the solution note of the service call in Microsoft Dynamics 365 for Finance and Operations.
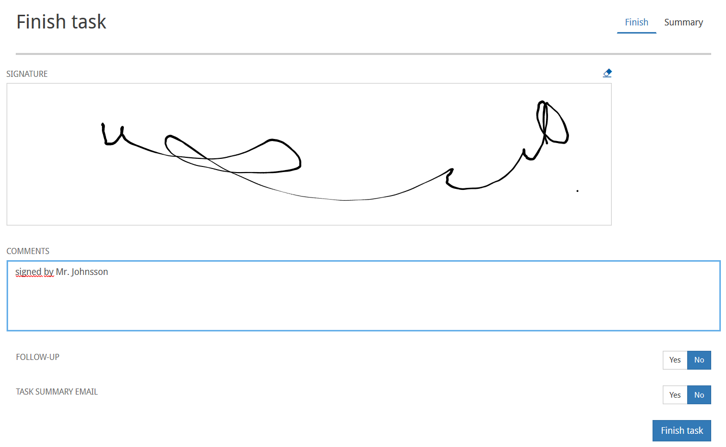
The ‘Finish task’ button of this form is the point of no return for the service task. The task will be finalized, is removed from the task list and the Engineer’s schedule, and is now visible in the ‘Closed Tasks’ list in the MFS app. All task related registrations will be sent to the Service Management module in the Microsoft Dynamics 365 for Finance and Operations back office for further processing. These registrations can include the following:
When the service task is finished, the service task registration is directly synchronized to Microsoft Dynamics 365 for Finance and Operations (as long as the app is online). Message processing should be active in the Microsoft Dynamics 365 for Finance and Operations back office in order to process the task registrations in Microsoft Dynamics 365 for Finance and Operations.
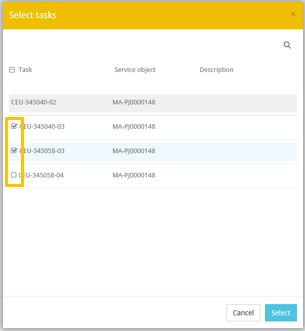
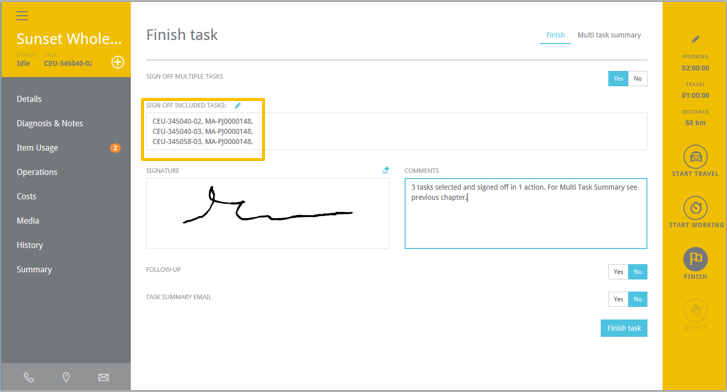
It is possible to sign off multiple task in one sign off action. That is possible for task of the same customer, the same service object and the status should be ‘Idle’.
First select a ‘main’ task that need to be finished and set the field ‘Sign off multiple tasks to Yes’
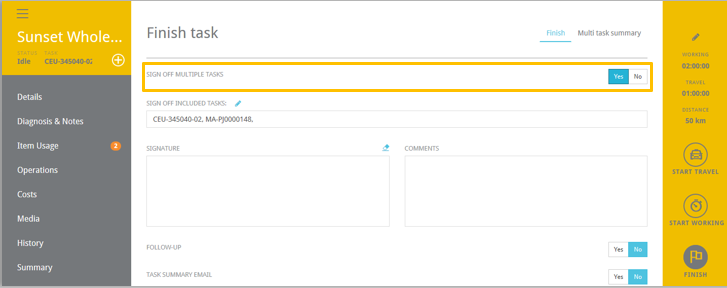
The following form will be displayed: the main task is in the top of the list and the tasks which are valid for selection are presented below the main task. After selecting the required tasks, hit ‘Select’.
After selection, the selected tasks are displayed in the section ‘Sign off’ included tasks. Further from this view it is possible to go to the Multi task summary or you can directly select ‘Finish Task’. When finished, all selected task will be closed, and xml-messages are sent to Microsoft Dynamics 365 for Finance and Operations and processed.
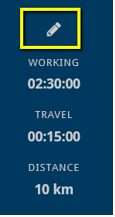
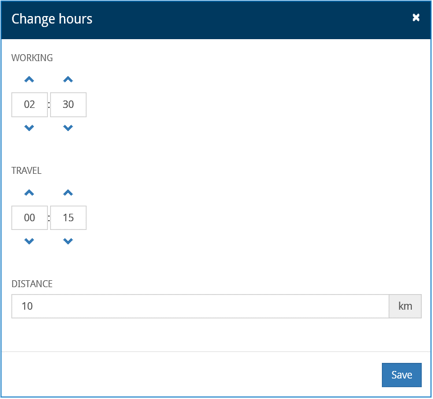
An MFS parameter is available in Microsoft Dynamics 365 for Finance and Operations in order to allow changing the working time, travel time and distance in the service task in MFS.

The parameter is being displayed in MFS settings as well:
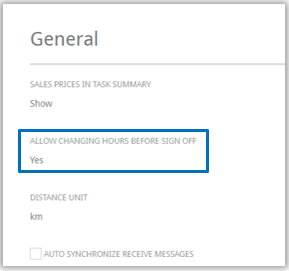
The result is that the ‘edit’ button, which is visible above the working time section, is enabled:
This functionality can be used for example when the engineer is allowed to round off times registered against the service task.
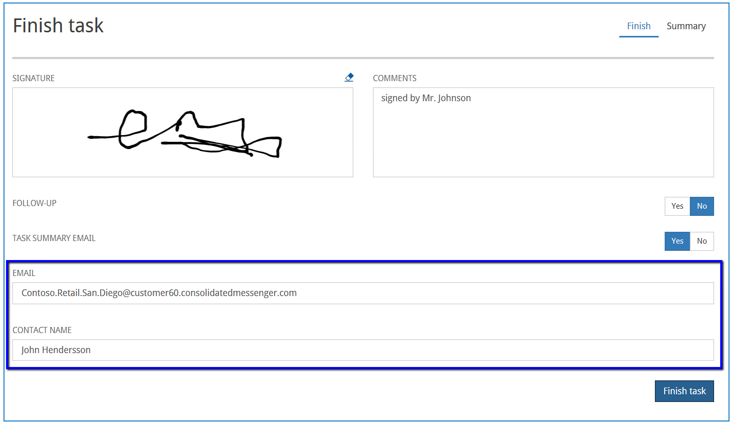
When a service task is finished, the engineer can send the task summary report in PDF format vie email to the customer. In order to do that Task summary email flag needs to be set to Yes.
Two new fields will show up on the form Email and Contact Name and are populated from the task contact information details or can be entered manually.
After finishing the task in MFS, the task will be inbounded processed in Microsoft Dynamics 365 for Finance and Operations. In that process the service task is registered which will trigger the email to the customer using the registration report from Microsoft Dynamics 365 for Finance and Operations.
Note that the MFS email function requires a Microsoft Dynamics 365 for Finance and Operations email setup that needs to be implemented first before the function will work correct.
The setup of this function is described in document Dynamics Software MFS Implementation Guide for DYS SMA and can be found in the same folder as where this user manual is stored on the ftp server.
When a task is finished, the engineer has the option to mark the task for a follow-up action. There are two options for creating a follow-up task and it is mandatory to select an event code.
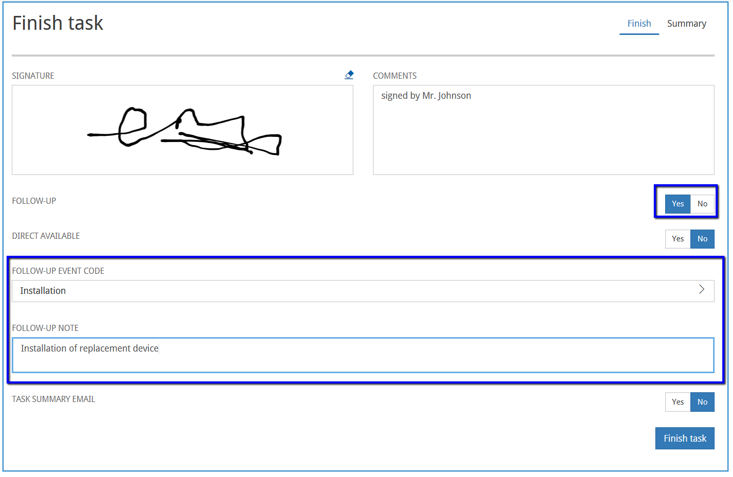
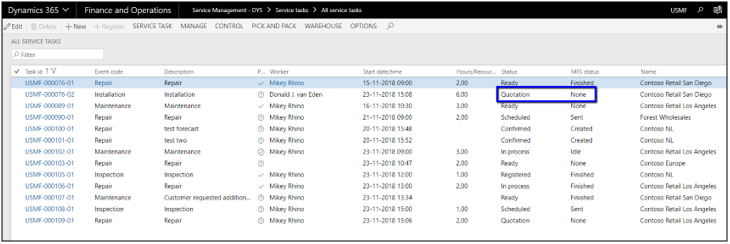
The first option is to select ‘Follow-up’ flag Yes and ‘Direct available’ No. This will result in a new follow-up task, using the event code selected, that will be created in Microsoft Dynamics 365 for Finance and Operations for the same service call. The status of the new follow-up service task will be ‘Quotation’ and can be scheduled to any engineer. The follow-up note will be visible in the progress note of the service call in Microsoft Dynamics 365 for Finance and Operations.
The second option is to select ‘Follow-up’ flag Yes and ‘Direct available’ Yes. This will result in a new follow-up task in MFS, using the event code selected. This new follow-up task from MFS will be synchronized to Microsoft Dynamics 365 for Finance and Operations and will be created for the same service call. The status of the new follow-up service task will be ‘Confirmed’.
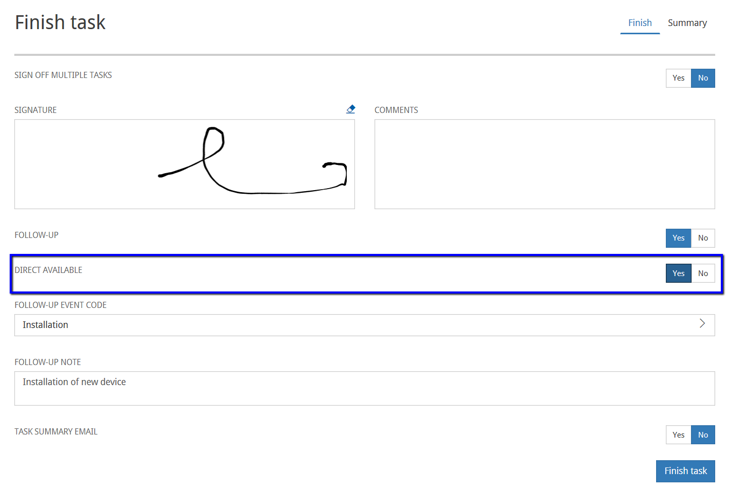
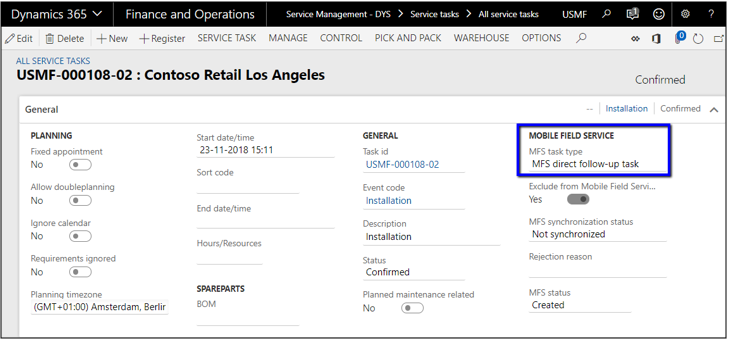
Because the task is already available in the MFS app of the engineer, the service task cannot be rescheduled in Microsoft Dynamics 365 for Finance and Operations (based on flag ‘System created task). Typically, these types of follow-up tasks can be used by an engineer for creating a new task in MFS, to be executed directly (also offline) or the without the next few days.
When the engineer finishes the task in MFS and the messages are processed in Microsoft Dynamics 365 for Finance and Operations, the service task will be updated with the transactions reported by the engineer.